
-
Please take a moment and update your account profile. If you have an updated account profile with basic information on why you are on Air Warriors it will help other people respond to your posts. How do you update your profile you ask?
Go here:
Edit Account Details and Profile
You are using an out of date browser. It may not display this or other websites correctly.
You should upgrade or use an alternative browser.
You should upgrade or use an alternative browser.
How do you carry?
- Thread starter OldNavy
- Start date
punx_clever
New Member
Kimber 1911 TL/RL II. I don't walk around with it, but it's with me when I travel... so I consider that a carry weapon
G26 in a Desantis IWB, G21SF/G20 in a Desantis OWB w/ thumb break.
Kimber Custom II with engraved F/A-18 either Milt Sparks Versa-Max II (IWB) or Milt Sparks Axiom (OWB) depending on clothing. I will also carry a S&W 642 via pocket holster from Pocket Concealment Systems or in a Richie Leather CQ-QR (OWB) when I'm only wearing shorts and a t-shirt.
Desantis makes great holsters. I used one (Superfly, I think) with a P3AT for a while. Anything Crossbreed, Comp-Tac, UBG or Milt Sparks is a winner. I had a Versa-Max II for a P229 that was awesome.
That they do. They're pricey, but good gun leather will last a very long time.
FlyinRock
Registered User
Mark Fricke appendix made of Kydex. Was not a fan until I saw this one. Faster than any holster I've owned. I've got some old Davis holsters that are still fast and well made and a Milt sparks IWB and a Davis that is similar with a neat swivel system so it can be adjusted or canted for your own needs.
That they do. They're pricey, but good gun leather will last a very long time.
I always recommend custom leather to anyone who asks. Sparks, Ritchie, Alessi, Rosen, Del Fatti, 5-Shot (John Ralston), Bulman - I'm probably missing a couple. If you can find a used on or stand to wait on the backlog they will last forever.
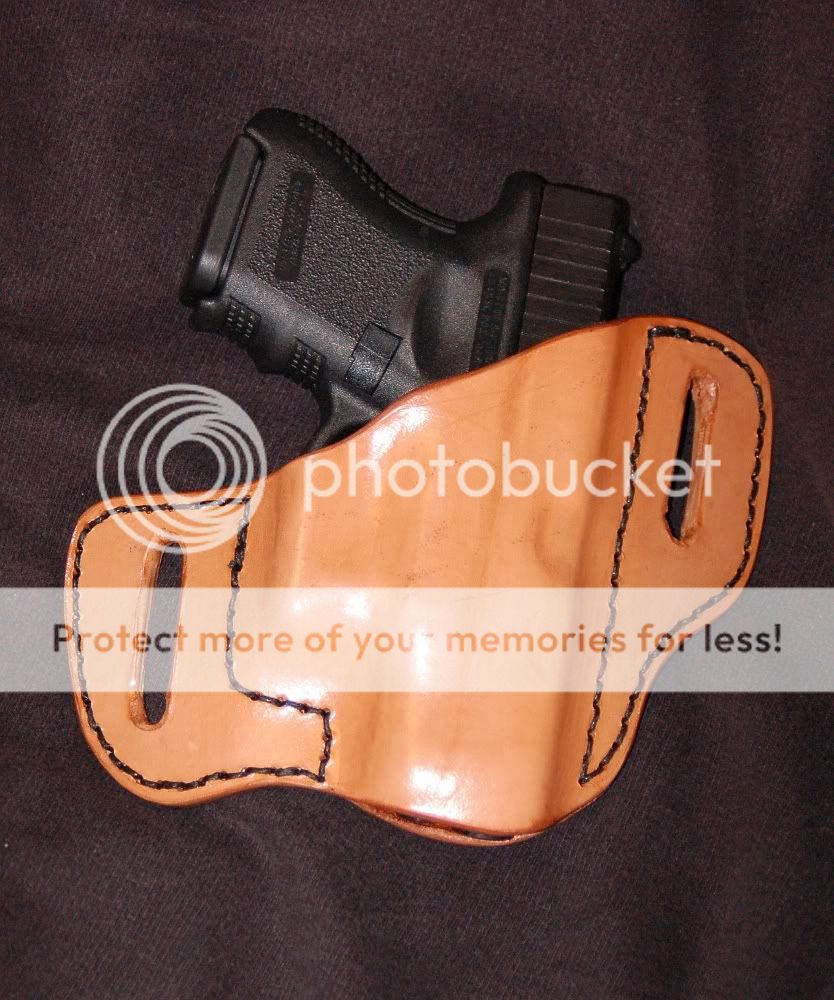
Nice rig for a DIY! Care to share the construction details?
Thank you. It's 7-8 oz leather - I believe it's shoulder. What I do first is trace the gun onto paper and then trace the design of the holster around the gun. Cut out the paper, and then trace it onto the rough side of the leather. Cut two mirror images out for each side of the holster using shears. Then I mark where to glue, then I glue the leather together, usually leaving some space where the gun is going to go. Let the glue dry.Nice rig for a DIY! Care to share the construction details?
Then it's time to mold the leather - immerse the leather in warm water for a few seconds, take out of water, then insert gun. Make sure it's in straight and how you want it, then start poking and prodding until the leather molds nicely around. Using a bone folder helps - a Sharpie pen is fine, too. I usually leave the gun in until the leather is pretty stiff. It'll take at least 12 hrs to dry depending on the weather.
I then use a sander to smooth the edges and make sure everything is even.
Then it's time to stitch. I use an 'overstitch' tool to mark where the holes will be, then I drill the holes on a drill press - use about a 0.1" drill bit. Then I use the double hand stitch technique using wax coated thread.
Then for the belt holes, I drill two pilot holes for each belt hole approx. 1.25" apart from the center of each (for a 1.25" belt). Then I use a chisel and chop away the leather.
Then I burnish the edges with the bone folder and gum tragacanth. The key to this is to rub as fast as possible creating as much heat/friction as you can. It makes the edges really smooth.
Then it's time to dye the leather (if you want) and then put a protective 'tan-kote' layer on throughout the inside and outside.
Let dry and practice your draw.
")
Here are some other ones I've done.
http://smg.photobucket.com/albums/v700/bowlingbinder43/Holsters/